
Many of you will have probably seen those scary looking hangboards in the corner of your local climbing gym. All those strange holes and edges can be very intimidating. Especially if you’re watching someone bust out some one-finger pull-ups, single-finger air planks, or some other outrageous exercise.
Do not fear, hangboards are just as useful for us mortals as they are for the strongest of climbers. And many of the exercises are not as impossible as you may think.
To help you harness the power of this training tool, I’m going to walk you through the essentials of hangboarding and then give you a simple 8-week beginner-friendly hangboard training program.
Why Use a Hangboard?
Many people get by fine without any hangboard training, but there are definitely a few areas in climbing that will benefit from the exercise.
Has finger strength always been your downfall in climbing?
Does overhangs and small holds terrify you?
Have you been stuck at a plateau since before you can remember?
In all of the strength metrics measured by climbing coaches, the only one which has a strong correlation with the ability to boulder 8A (V11) is whether or not the climber can hang an 18mm edge with 1 arm.
There is no question that hangboarding is one of the best ways to increase grip strength and upper body power. If you aren’t a genetic triumph built for climbing, it is very likely necessary to reach your full climbing potential.
The Essentials: 6 Tips for Preventing Hangboarding Injuries
Hangboarding done wrong can be a first-class ticket to injury town — a lonely place where you can never try hard. Here are 6 tips to help you prevent hangboarding injuries.
1. Do Not Full Crimp
There are 3 main types of grip used in climbing:
1. Open hand

2. Half crimp

3. Full crimp

Only the first 2 grips are safe to use on a hangboard. You are welcome to choose between them to tailor to your weaknesses but, if you’re a hangboarding beginner, I recommend using half crimp.
If you are having a couple of hangboarding sessions a week, it could be a good idea to have one session with each grip. There is a massive difference between the 2 and, all the training in the world on one might still leave you as weak as a kitten on the other!
2. Retract Your Shoulders
When doing any form of hanging exercise your shoulders should be locked down, not sagging up by your ears. If this is a limiting factor for you then alternative training for scapular retraction should be your priority before doing any hangboarding.
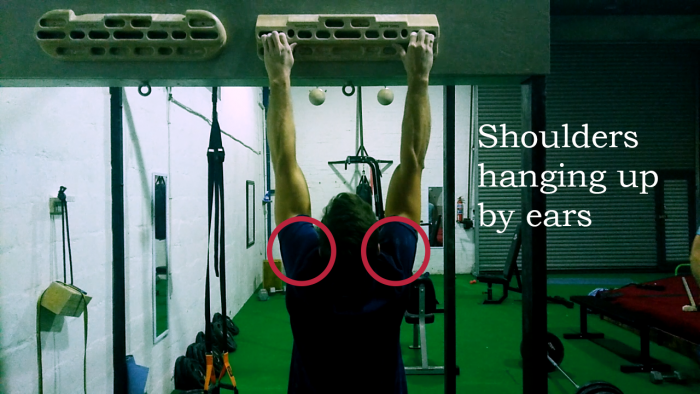

On the other hand, try to make sure you are not retracting your shoulders so far as to activate your chest and arch your back.

Done correctly, you should end up with a slight bend in your elbow as a result of correct muscle activation. The bend it slight! We aren’t looking for 90° lock offs here. See the correct and incorrect examples below.


If you aren’t sure about this then ask someone (who looks like they know their way around a hangboard) how your form is. The climbing angels weep every time someone hangs on sagged shoulders.
3. Warm Up
Hangboarding takes no prisoners, so you’re risking injury every time you don’t warm up properly.
A good warm-up has 3 components:
- Pulse raiser (cardio)
- Limbering up (dynamic stretching)
- Easy, strength-based movement such as pull-ups/shrugs on jugs or low-grade climbs
Your warm up should be at least 15 minutes long and even after this, I feel like my fingers still need more warming up. I’ll usually do some easy to medium-difficulty climbs for half an hour and then some short hangs on increasingly harder holds.
Check out our climbing warm-up routine for inspiration.
4. Warm Down
You should always be doing some form of warm down after any training session, but having one after a hangboarding session is particularly essential. Your fingers are delicate joints which won’t have a massive amount of blood flow through them on normal, daily activities.
This means that you’ve gotta put that little bit of extra effort in to clear that lactic acid and other gunk out before your arms cool down and it stays there.
If I have a hangboard session without warming down, I can feel it the next time I try to climb. My fingers and forearms will feel extra heavy, stiff and almost sticky. This is a direct effect of not warming down and trying to climb or train in this state can leave you very prone to injury!
After every hangboard session, take a bit of time to do some easy climbing and some low-level cardio for 5-15 minutes, if you’ve got the facilities. I find jump-roping to be one of the best and easiest exercises for getting blood flow around the body.
Massage improves blood flow and eases muscle sorness by pushing out those sticky exercise juices, so I also like to massage my forearms after a particularly finger-intensive hangboarding session. By this I mean I lightly squeeze and rub my forearm with my other hand. No fancy equipment or techniques. The low-level exertion this requires is also beneficial for the hand doing the massaging.
5. Stretch
No warm down is properly complete without some stretches. There are 2 main types of stretches.
- Dynamic stretches, which you should be doing during your warm up to limber up
- Static stretches, which you should be doing during your warm down to maintain flexibility
Dynamic stretches involve movement and the idea is to not bend or stress a joint too hard. Instead, you want to smoothly flow through the joint’s range of movement and see if it increases after a few cycles.
Dynamic stretches for the wrists and forearms are pretty straightforward. They involve things like wrist circles, flicking your fingers and making fists. Anything that uses the joint’s movement range without stress can be a good dynamic stretch as it will loosen the joint and increase blood flow.
Jazz hands are an excellent thing you can do to limber up while still being fabulous.
Static stretches are what your idea of a more typical stretch would be. Here the intention is to move the joint into a position that is towards the end of its movement range and hold it here or slowly let it ease in a bit further for an extended period of time.
These stretches should not be done before training and definitely shouldn’t be done before warming up! They are much more effective as part of the session warm down.
Static stretches should be held for 30 seconds each time and you should aim to carry out 3 or 4 sets after a hangboard session.
I recommend stretching all parts of the forearm and fingers (not just the flexors) so you should be doing a few different stretches here. An example of each could be holding your hands in a prayer position for the flexors, and then later pressing the back of your hands into the ground for the extensors.
You can find a much more detailed explanation on static stretches here and I highly advise you use the forearm stretches in that article.
6. Don’t Advance Too Fast!
This is what gets everyone.
It should take at least 2 months before noticing any significant improvements in hangboarding and there is never a point where you are not prone to overdoing it.
The healthiest way to look at hangboarding is as something in the background to facilitate climbing. Especially at the start, your goal with hangboarding should be to climb harder routes, not to hang from the smallest edge possible. If you decide to try a tougher edge every week, it’s possible to be caught off guard!
With many finger injuries, there aren’t any warning signs. One minute you’re feeling psyched about how you’re so much stronger than you thought you would be — and the next you can’t even lift the kettle to make a cup to tea to deal with the traumatic event that was your finger pulley exploding!
If you’ve not thought about training for climbing before then I would just go for one of the easiest edges (that aren’t jugs) on the board and work off of those.
If you have quite a bit of climbing experience but have never hangboarded, then it might be worth testing some of the thinner or less positive edges. Don’t worry about pushing yourself though. Even a relatively easy hangboard routine will still give you big improvements if you’ve never done it before!
Trust me, the people who develop these training plans have experienced enough injuries to know which rates of progression work and which don’t.
The 8-Week Hangboard Training Plan for Beginners
When I first looked into hangboarding, I was overwhelmed by the number of different boards and variations in training plans. Truth is, your first hangboard training plan doesn’t need to be complicated at all. Here is a simple 8-week plan to give you the foundations for more advanced training.
Each week consists of 2 hangboard sessions. Make sure you are rested beforehand (don’t have your hangboard sessions the day after a massive climbing session) and always warm up properly.
Preparation

Choose a pair of holds on your board that you can hang with good form (remember The Essentials) for 10 seconds but struggle or fail by 14-15. Then follow this week-by-week progression.
Week 1
- 10 second hang
- 30 second rest
- Repeat steps 1-2 for 4 reps overall
- 2 minute rest
- Repeat steps 1-4 for 3 sets overall
Weeks 2-3
Repeat the steps in Week 1, this time for 4 sets overall
Week 4
Repeat the steps in Week 1, this time for 5 sets overall
Week 5
- 10 second hang
- 20 second rest
- Repeat steps 1-2 for 4 reps overall
- 2 minute rest
- Repeat steps 1-4 for 3 sets overall
Weeks 6-7
Repeat the steps in Week 5, this time for 4 sets overall
Week 8
Repeat the steps in Week 5, this time for 5 sets overall
What to Expect Your First Time Hangboarding
For your first session or two, set your expectations low. Don’t expect to hang on tiny edges or see strength gains right away.
Your tendons and ligaments do not respond the same way muscles do — hangboarding won’t feel like a gym workout, and the benefits will take longer to materialize. Hangboarding takes persistence, patience, and above all, prudence.
If you go too hard too soon, you’re likely to injure yourself. Pulley tendon injuries are a high price to pay for overenthusiasm (take it from someone who’s had more than one).
Instead, focus on form. Get used to the feeling of hanging on the board. See how sets of hangs feel, and note how your body and fingers respond. If your fingers tire before you expected, that’s okay! The main purpose of the first few sessions is to introduce your body to the demands of hangboarding. Stick to your training plan and increase load gradually.
Resist the urge to overtrain. Don’t add extra hangs to your workouts or extra sessions to your week. Hangboarding is like liquid chalk: a little goes a long way.
Even if the session feels easy, don’t neglect your warm-up and warm-down. When you first start hangboarding, setting your routines and habits is just as important as completing the workouts.
In short: expect to take it slow, and trust the process. Your body (and fingers) will thank you — and you’ll be climbing stronger before you know it.
For more training articles, check out our guide to bouldering training.


